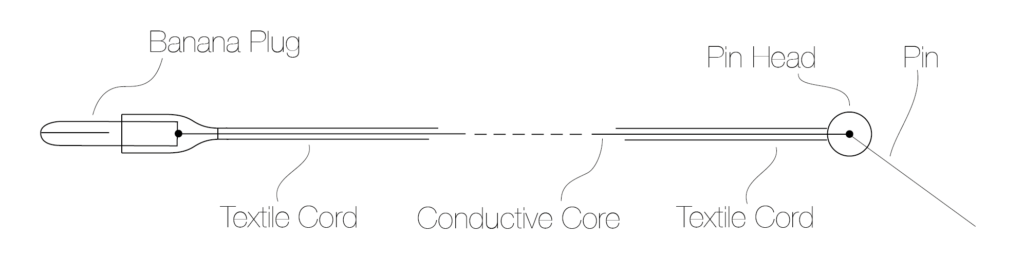
Pin Probe, eTextile Swatchbook 2017
Materials

- 4mm banana plug
- 9mm shrink tube (3:1)
- paracord (or an other flexible cord that lets you puush through a thread in the middle)
- conductive thread (I am using a 7×5 cement covered copper thread from Karl Grimm. if you have a thinner or less conductive material bread it together or use several strands to increase the conductivity. you can also use a flexible cable)
- 3D printed handle (Shapelock could also be used to form a handle if no 3D printer is available)
- pin
Tools

- scissors, cutter knife, glue gun, lighter, screw driver, multimeter, solder iron, solder, needle
- 3D printer if you want to print the handle, .stl file
DIY instructions
cut 1 meter off the paracord (you can adapt the length if you want you probe cord to be longer or shorter)
pull out the inner nylon cord

thread a (stump) needle with the conductive thread (or cable) and push it through lengthwise through the paracord until it comes out at the other end

when pushed through, remove the needle and make a knot. spread the paracord coating evenly across the conductive core


put some solder on the knot (this is optional, but I noticed it makes it easier to establish good contact)

push the knot into the banana plug and fix it in screwing the screw in. try pulling on it to make sure it is fixed


slide the end of the cord coating into the banana plug as well. cut of the fraying ends of the conductive thread

measure the resistance between the connector part of the banana plug and the conductive thread at the other end of the cord. the resistance should be below 1 Ohm but depends on what material you are using

if all looks good, cut the conductive thread on the other side leaving it 3cm longer than the covering cord
use the glue gun to fix the conductive thread and cord into the banana plug


cut a 3 cm piece from the shrink tube
cover the banana plug with the shrink tube and heat it so the tube shrinks around the banana plug and the first few millimeters of the cord

cover the banana plug with the shrink tube and heat it so the tube shrinks around the banana plug and the first few millimeters of the cord

let it hang verticallly so the glue hardens with the cord in the middle. this side of the probe is now finished

pull back the cord a bit and make a knot where the conductive thread exits the cord

push the pin through the knot

fix the knot with a drop of solder, make sure the drop is not too high. if you are using a cable, solder the cable to the needle

cut off any fraying ends of the cord and burn them carefully
measure the resistance between the banana plug and the pin. the resistance should not be higher than what you measured last time. cut off the rest of the conductive thread, or cable

put some hot glue in the bottom part of the 3D printed handle, between the two openings

place the needle in the handle so that the connection between the needle and the cord is in the middle

if necessary put some more glue and close the handle with the 3D printed top. quickly place the top before the glue dries

hold the glued handle together for a little while until the glue is dry/hard

measure the resistance between the two ends of the probe. the resistance should not be higher than what you measured last time, ideally it is lower, as everything is closely glued together now. you can do the measuring in plugging the Pin Probe into the multimeter and contact the pin with the other probe

the Pin Probe is now finished

Making Of
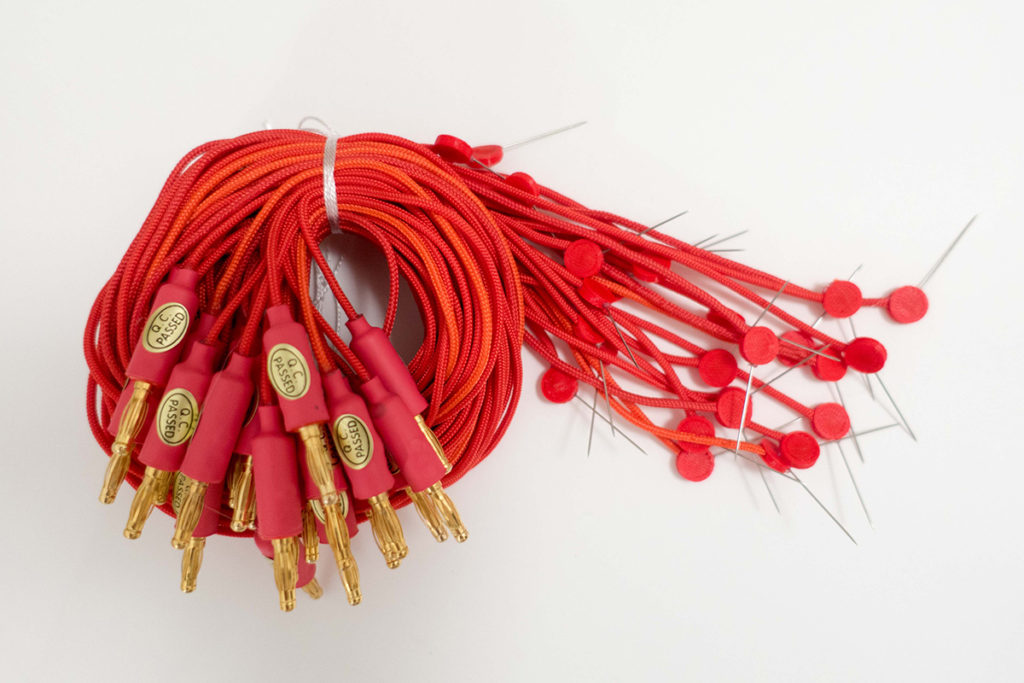
 materials prepared for Pin Probes
 waste after the production of Pin Probes #etextilewaste #wickedfabrics
Pin Probes for the eTextile Swatchbook 2017